Silverlight provides a new way to develop and deploy business applications in the familiar .net environment. Such applications are generally written to automate business processes, provide UI to visualize/manipulate data, and have various business rules ranging from data integrity to complex conditional logic.
In next couple of posts, I am planning to introduce the basic building blocks of a data centric application (primarily using DataGrid control), which can be used to develop full fledge business application.
Caution/Disclaimer: Code is for demo purpose only. It is neither production quality nor does it use any of the best practices.
Part 1: Getting Started with Silverlight
Part 2: Adding new item
Part 3: Updating existing Item
Part 4: Deleting item
Building Silverlight Application using MVVM Part 1: Getting Started with Silverlight
I am assuming that you have already installed Silverlight (SDK and tools) and are familiar with basic concepts. If not, please head over to http://silverlight.net/GetStarted/, install requisite software and explore various getting started tutorials (Be sure to read Scott Guthrie's 8-part blog series)
Ok, let get started!
Launch Visual Studio and create a new Silverlight application and name it SilverlightCRUDDemo

Also create the corresponding web application to host and test the Silverlight application

Model
We will use a simple data model consisting of a entity Person. Person class consists of FirstName, LastName, Age and City fields.
Create a new folder Model in SilverlightCRUDDemo Project and add a new class called Person.cs to the Model folder with the following code

ViewModel
Add another folder ViewModel in SilverlightCRUDDemo project and add a class ViewModelBase.cs to the ViewModel folder with the following code (you will also need to add using System.ComponentModel namespace directive)

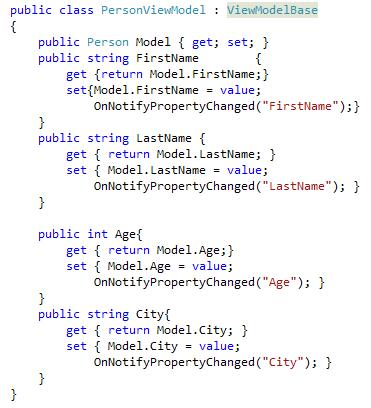
Add another class PersonViewModel.cs to the folder ViewModel in SilverlightCRUDDemo project and add following code (you will also need to add using SilverlightCRUDDemo.Model namespace directive)
Add another class PeopleViewModel.cs to the ViewModel folder in the SilverlightCRUDDemo project and add the following code (you will need to add using SilverlightCRUDDemo.Model and using System.Collections.ObjectModel namespace directives)

View
Open MainPage.xaml and switch to Xaml view to add DataGrid to Xaml. First add xml name space reference for SilverlightCRUDDemo.ViewModel with prefix view as
xmlns:view="clr-namespace:SilverlightCRUDDemo.ViewModel". Now add the UserControl and DataGrid code, following shows the complete MainPage.xaml

Now run the application by using F5, you should have following UI

Congratulation! Play around with various DataGrid features and get a feel for the UI.
Now that we have a running application, next task is to allow user to add new items, make changes and delete items. We will tackle creating new item in next post.
Superb article
ReplyDeleteWould ve looked better with more explanation...
ReplyDeleteCan I download this demo, coz there are images in code or you can send me on my email abdulrehman1977@yahoo.com
ReplyDeletegud article
ReplyDeleteThis comment has been removed by a blog administrator.
DeleteCreate article but u can use a servicelocator for total independante....
ReplyDelete