Monday, September 27, 2010

Building Silverlight Application using MVVM Part 4 - Delete Item

This is part four of Silverlight Application using MVVM-CRUD Operation that showcases the basic building blocks of a data centric application. 
Deleting an item is quite similar to adding an item. Instead of adding new item to the collection, we just remove the selected item from the collection.

To allow user to delete the selected person, add new Delete button to StackPanel in which Add button was added earlier. The xaml code for that stackpanel will look like as shown below -


Additionally, set the SelectedItem attribute of the DataGrid as
SelectedItem = "{Binding SelectedPerson, Mode=TwoWay}"
in Mainpage.xaml file. The code for datagrid look like as shown below -


Add a Property "SelectedPerson" and method "DeletePerson" to delete the selected person in the PeopleViewModel.cs file in the ViewModel folder as shown below -


Now add handler for delete click event in MainPage.xaml.cs as shown below -


F5 and run the application. The UI will be as shown below -


Select any row from the datagrid and click on delete button, corresponding row will be delted from the datagrid.

At this point we have a complete functioning application that allow user to add data, update data and delete. Next we will take on validation. 

Building Silverlight Application using MVVM Part 2 - Add Item

This is part two of Silverlight Application using MVVM-CRUD Operation  that showcases the basic building blocks of a data centric application. 
In classical applications, the DataGrid or similar UI control takes over the control of data and servers as both the visualizer and data container. When writing logic in such applications, developer deals with DataGrid directly. However with XAML (Silverlight/WPF) there is more stricter separation of duties, UI provides data visualization and all manipulation is done to the data itself.
In order to add new item (row to DataGrid), you have to first add new item to underlying data source, People. When a new Person is added to Person collection (People), a new row appears in the DataGrid. Behind the scenes, when you add new item to the People, the observable collection fires collection changed event that triggers DataGrid to update the UI.
Add a new button, Textblocks and Textboxes to capture the new data to be added to UI as shown below -


Add a method to the PeopleViewModel.cs class in ViewModel folder as shown below -


Add the code for click event of the add button and save button. The code for main page looks like as shown below (You will also need to add
using SilverlightCRUDDemo.Model and using SilverlightCRUDDemo.ViewModel
namespace directives)


F5 and run the application. Now when you click Add button, a new panel is shown to the right of DataGrid as shown below -

Enter "Jonty" as first name, "Leahy" as last name, 35 as age and "Springfield" as city and click on save button. A new item with the detail specified is added to the datagrid as shown below -


We have done the add item code using button handler as of now. We will revisit Add item feature and enhance it to provide this behavior when we implement ICommand interface in future.

Please note that I have not implemented any validation in this code. I have left the code for updating an item to the user. In my next post, we will be going to learn how to delete an item.

Friday, September 24, 2010

Building Silverlight Application using MVVM Part 1 - Getting Started with Silverlight

Silverlight provides a new way to develop and deploy business applications in the familiar .net environment. Such applications are generally written to automate business processes, provide UI to visualize/manipulate data, and have various business rules ranging from data integrity to complex conditional logic.
In next couple of posts, I am planning to introduce the basic building blocks of a data centric application (primarily using DataGrid control), which can be used to develop full fledge business application.
Caution/Disclaimer: Code is for demo purpose only. It is neither production quality nor does it use any of the best practices.

Part 1: Getting Started with Silverlight
Part 2: Adding new item
Part 3: Updating existing Item
Part 4: Deleting item

Building Silverlight Application using MVVM Part 1: Getting Started with Silverlight

I am assuming that you have already installed Silverlight (SDK and tools) and are familiar with basic concepts. If not, please head over to http://silverlight.net/GetStarted/, install requisite software and explore various getting started tutorials (Be sure to read Scott Guthrie's 8-part blog series)
Ok, let get started!
Launch Visual Studio and create a new Silverlight application and name it SilverlightCRUDDemo

Also create the corresponding web application to host and test the Silverlight application


Model
We will use a simple data model consisting of a entity Person. Person class consists of FirstName, LastName, Age and City fields.

Create a new folder Model in SilverlightCRUDDemo Project and add a new class called Person.cs to the Model folder with the following code

ViewModel

 
Add another folder ViewModel in SilverlightCRUDDemo project and add a class ViewModelBase.cs to the ViewModel folder with the following code (you will also need to add using System.ComponentModel namespace directive)


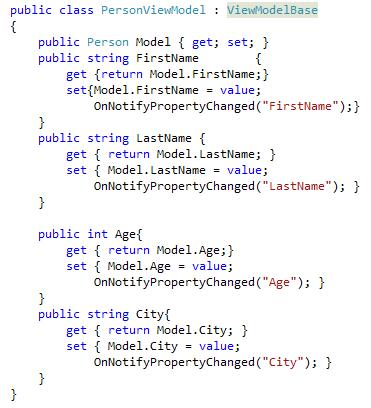
Add another class PersonViewModel.cs to the folder ViewModel in SilverlightCRUDDemo project and add following code (you will also need to add using SilverlightCRUDDemo.Model namespace directive)


Add another class PeopleViewModel.cs to the ViewModel folder in the SilverlightCRUDDemo project and add the following code (you will need to add using SilverlightCRUDDemo.Model and using System.Collections.ObjectModel namespace directives) 

View

Open MainPage.xaml and switch to Xaml view to add DataGrid to Xaml.  First add xml name space reference for SilverlightCRUDDemo.ViewModel with prefix view as
xmlns:view="clr-namespace:SilverlightCRUDDemo.ViewModel". Now add the UserControl and DataGrid code, following shows the complete MainPage.xaml


Now run the application by using F5, you should have following UI
Congratulation! Play around with various DataGrid features and get a feel for the UI.
Now that we have a running application, next task is to allow user to add new items, make changes and delete items. We will tackle creating new item in next post.